Nothing beats the look of a home with perfectly installed permanent outdoor lighting. If you’re thinking about upgrading your outdoor lighting setup, it’s important to plan ahead for the best results. But if you’ve ever tried to install Govee lights on a house with uneven rooflines, you know the frustration. Slopes, odd angles, and inconsistent eaves can turn a straightforward project into a puzzle. I’ve seen it countless times, and it’s why so many DIY installations look, well, a little off.
The good news is that you don’t have to settle for a crooked or sagging light display. As a Marine Corps Veteran and the founder of Deliciosa Decor, I’ve spent years designing and testing solutions for these exact problems because I wanted a great experience and results with my own installations. I’ve installed Govee permanent outdoor lights on some of the most challenging rooflines you can imagine. If you want to avoid climbing on the roof or using ladders, using a suspension string kit is a great option for safe and easy installation. With the right planning, tools, and mounting solution, you can achieve a clean, professional finish that lasts, so keep reading to learn how to install Govee Permanent Outdoor Lights.
Photo by Alex Robert on Unsplash
Understanding Govee Permanent Outdoor Lights Before You Install
Before you open the box, it’s important to understand what makes Govee permanent outdoor lights unique. These aren’t your typical holiday string lights or simple LED light strips. Govee lights are weatherproof, making them suitable for year-round use in any climate. They also offer more options in terms of styles, colors, and configurations compared to standard string lights, allowing you to customize your outdoor lighting setup to match your preferences. This means the installation needs to be secure and durable.
The biggest challenge with uneven rooflines is that the included clips and adhesive backing are designed for perfectly flat, clean surfaces. When you introduce slopes, textured soffits, or varying eaves, that adhesive is often the first thing to fail. Homeowners often try to force the strips to stick, only to find them drooping a few weeks later. The key is to approach the installation with a different mindset—one focused on a secure mechanical fit, not just adhesive.
With proper care, Govee Permanent Outdoor Lights can last up to 50,000 hours, making them a long-lasting solution for your home.


Planning Your Layout on Uneven Rooflines: How to Install Govee Permanent Outdoor Lights
A successful installation is 90% planning. Before you climb a single ladder, you need a solid plan. I always start by measuring the entire length of the roofline, including all the tricky peaks, soffits, and eaves. Measuring the installation area is crucial to ensure the lights fit properly and to avoid excess wiring. Use a flexible measuring tape to get an accurate reading on every angle and turn.
As you measure, select and choose the locations you want to illuminate, such as rooflines, patios, or fences. Where will the lights be most visible from the street? Where is your power source? Always start your installations nearest to your power point and then proceed towards the outer side. Plan your layout to minimize long extension cords and hide connections. When dealing with corners and slopes, figure out the best way to transition the light strips—will they wrap tightly, or will you use a jumper? For optimal appearance, Govee lights should be positioned approximately 5-10 cm away from the wall to achieve a balanced lighting effect and avoid glare. Planning the path of your light strips and accounting for their length and spacing now will prevent you from having to backtrack later.
Tools and Materials You’ll Actually Need
For a successful installation, you will need a ladder, a drill, a measuring tape, a pencil, mounting clips or screws, and the Govee light kit. If you don't already have some of these items, they can be easily purchased from online retailers or local hardware stores.
To get the job done right, you’ll need more than what comes in the box. Here are the basic tools I recommend:
- Drill with a quality bit set
- Corrosion-resistant screws
- Measuring tape
- Level (a laser level is even better for long runs)
The Govee control box or hardware device should be installed in a location that is accessible for setup and troubleshooting.
Moisture is the enemy of any outdoor electrical installation. Ensure all your connections are weather-resistant. While the included clips can work on flat sections, they often aren’t enough to secure lights on uneven or angled surfaces. This is where choosing the right mounting solution becomes critical. A secure mount will save you from the headache of re-doing the work next season.
Step-by-Step Guide: Installing Govee Permanent Outdoor Lights on Uneven Surfaces
Installation time for Govee Permanent Outdoor Lights is typically 2-4 hours, depending on the length of the lights and the mounting surface.
- Mount on Sloped Rooflines: Start at one end and use a level to establish a straight line. Use 3M adhesive tape and screw clips for secure mounting, inserting clips every 12-18 inches for support. Based on user reviews, it is recommended to use weatherproof adhesive clips or mounting brackets to prevent sagging. The mount should hold the light firmly against the surface without pinching the wire. Avoid making sharp bends with the light strips to prevent breaking the wiring and causing performance issues.
- Address Uneven Soffits: If your soffits have inconsistent spacing or texture, find the most consistent line and follow it. You may need to adjust the placement slightly up or down to keep the lights looking straight from a distance. Again, mechanical fasteners are your friend here. Use connector clips or extension cables included in the Govee kit to bridge gaps between strips as needed. Avoid cutting the light strips unless specified by the manual to prevent voiding the warranty or damaging the LEDs.
- Manage Eaves with Inconsistent Spacing: For eaves, the goal is a clean, uniform look. I often create a guideline with a chalk line to ensure the lights follow a straight path, even if the eave itself isn’t perfect. Secure the lights at each end and then in the middle, adjusting as you go to keep the line taut and straight. Fix the lights with the mounting clips and screws provided, and place both pucks horizontally with the aid of a level tool to ensure symmetry.
Always avoid drilling directly into areas where water might pool. Ensure all connectors are securely fastened and sealed with waterproof caps to avoid LEDs not lighting up and to keep the system properly connected. A well-placed mount not only secures the light but also helps protect it from moisture.
Powering, Connecting, and Testing Your Govee Lights
With the lights mounted, you need to handle the power connections. Route your power cables cleanly along corners or trim to make them as invisible as possible. Secure any loose cables to prevent them from getting snagged or damaged. Make sure all connectors are securely fastened and sealed with waterproof caps to avoid LEDs not lighting up.
If you need to connect multiple light strips, ensure each device is properly connected and that all connections are tight and waterproof for optimal performance. Before you tighten every screw and put the ladder away, test the system. Use the Govee app on your phone to turn the lights on. Cycle through different colors and brightness levels to ensure every light is working and the placement looks right from the ground.
When setting up Wi-Fi, ensure you are using a 2.4 GHz network for your Govee lights. If you experience a weak Wi-Fi signal, try resetting your router or bringing it closer to the device for a more reliable connection.
How Custom Light Mounts Solve Uneven Roofline Problems
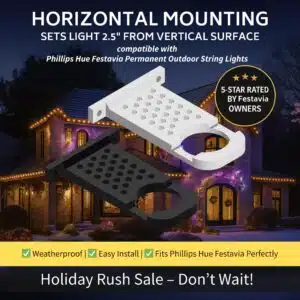
This is where I saw the biggest need for a better solution. The standard clips just don’t work for every home. That’s why I started designing and 3D printing precision-fit mounts. I had to figure out the best way to use custom mounts for uneven surfaces, ensuring a stable, flat base for the light even on tricky fascia or soffits. A custom mount solves the problem of uneven surfaces by creating a stable, flat base for the light. It holds the light strip securely, protecting your investment from weather and gravity.
If your light strips do not match the length of your installation area, such as along gutters, using a splice kit can help you connect the strips seamlessly for a watertight and continuous look.
Our Deliciosa Decor mounts are engineered to fit Govee systems perfectly, giving your installation a clean, professional appearance that you can’t get from generic clips. It’s the difference between a temporary setup and a truly permanent outdoor lighting solution.
Common Installation Issues and How I Fix Them
Even with careful planning, you can run into issues. Here are a few common ones reported by users and the options available to address them:
- Lights Not Sitting Flush: This is usually due to an uneven surface. A custom mount can fix this by creating a uniform anchor point.
- Sagging or Crooked Lines: You need more support. Add secure mounts between the existing clips to straighten the line.
- Adhesive Failure: Clean the surface thoroughly with isopropyl alcohol before applying any adhesive. If adhesive pads fail, replace them and use screws as a backup option to secure Govee lights, especially in high-moisture or textured areas.
For splices, applying petroleum jelly before using shrink wrap can help prevent water intrusion and ensure a solid connection. Regularly check all connections for moisture to maintain the performance of your Govee lights after installation. Always avoid making the light strips make sharp turns or travel around rough edges to prevent damage.
If something doesn’t look right, stop and re-adjust. Forcing a fit will only lead to problems down the road.
Final Tips for a Clean, Professional Finish
To make your installation look less like a DIY project and more like a professional job, take your time with alignment. A straight line is everything. Before you call it done, test a few different lighting pattern options in the app—these lights offer a variety of preset scenes for different occasions, enhancing the outdoor atmosphere. Explore the available options and choose your preferred scenes to see how they look from afar. The goal is to make your setup look intentional and fully integrated with your home’s architecture.
Maintenance and Upkeep for Your Govee Permanent Outdoor Lights
Once your Govee permanent outdoor lights are installed, a little regular maintenance goes a long way in protecting your investment and ensuring your home shines bright all year. Permanent outdoor lights are designed for durability, but exposure to the elements means they’ll benefit from some simple upkeep.
Start by making it a habit to visually inspect your outdoor lights every few months, especially after heavy storms or seasonal changes. Check that all Govee permanent outdoor mounts and connections remain secure and that no sections of the light strips are sagging or pulling away from the house. If you spot any loose mounts or clips, tighten them up to keep your lights looking crisp and professional.
Cleaning is another key step. Dust, pollen, and debris can build up on your Govee permanent outdoor lights, dimming their effect. Use a soft, damp cloth to gently wipe down the light strips and mounts—avoid harsh chemicals that could damage the finish or compromise waterproofing. Pay special attention to areas where moisture might collect, such as under eaves or along soffits, to prevent mold or corrosion.
Protecting your lights from moisture is crucial for long-term performance. Ensure all connections remain weatherproof and that any exposed wiring is properly sealed. If you notice any signs of water intrusion or corrosion, address them promptly to avoid bigger issues down the line.
Finally, use the Govee app to periodically test your lights. Cycle through different colors and brightness levels to confirm every section is working as it should. If you notice any dimming, flickering, or connectivity issues, troubleshoot right away—sometimes a simple reset or reconnection can solve the problem.
By following these tips and making maintenance part of your routine, you’ll ensure your Govee permanent outdoor lights continue to enhance your home’s curb appeal and provide reliable, beautiful illumination year after year. And remember, with Deliciosa Décor’s custom mounts, you’re already a step ahead in keeping your lights secure and protected, no matter what the weather brings.
Making Permanent Outdoor Lighting Easy and Stress-Free
An uneven roofline doesn’t have to stand in the way of having beautiful permanent outdoor lighting. With the right approach and the right hardware, you can achieve a stunning result that you’ll be proud of. My mission at Deliciosa Decor has always been to blend beauty with function, and that means creating products that solve real-world problems for homeowners.
A clean, secure installation is absolutely achievable. If you’re ready to get a perfect fit for your Govee lights, explore our custom light mounts. Have a unique challenge? Reach out to us. We’re here to help you get it right.
Read more about installation, tips, and tricks for your permanent outdoor light setup. These resources provide tips, guides, and insights to make your installation process smooth and efficient:
- Govee Permanent Outdoor Lights Installation: A step-by-step guide from Govee's official blog, covering tools, preparation, and installation tips. Read more here
- The Best Guide to Govee Light Installation: A detailed guide with practical tips like testing lights, cleaning surfaces, and mounting techniques. Check it out here
- How to Install Govee Permanent Outdoor Lights (Step-by-Step Guide): A comprehensive guide with a focus on tools, safety, and weatherproofing for outdoor installations. Learn more here
- Install Tips and Tricks on Reddit: A community-driven resource with user-shared tips, including creative mounting solutions. Explore the discussion here
- Installing Outdoor Lighting to Enhance Your Property: A general guide on outdoor lighting installation, covering planning, budgeting, and maintenance. Read the guide here
- Govee Support Center: Official support from Govee, including FAQs, troubleshooting, and product-specific installation guides. Visit the support center
- YouTube Tutorials on Govee Light Installation: Visual step-by-step tutorials for installing Govee lights, shared by various creators. Search “Govee light installation” on YouTube for a variety of helpful videos.
These resources should provide a well-rounded set of tips and instructions for your blog readers!