I’ve spent countless hours on ladders, staring at rooflines, and working with homeowners who just want their house to look amazing at night. If there is one thing I have learned in my time designing precision mounts for outdoor systems, it’s that the quality of your installation matters just as much as the quality of the lights you buy. You can have the most expensive, high-tech lighting system on the market, but if the spacing is off or the wires are drooping, it ruins the entire aesthetic.
That is why I often find myself talking about the Govee Permanent Outdoor Lights Pro. These aren't the standard string lights that you throw up in December and take down in January.
They are a serious investment in your home’s curb appeal. They are powerful, customizable, and designed to stay up year-round. But because they are “permanent,” getting the installation right the first time is critical. You don’t want to be peeling adhesive off your soffits six months from now because you rushed the prep work.
In this guide, I want to walk you through exactly what makes the Pro version different, how they stack up against the competition, and the specific installation pitfalls you need to avoid. Whether you are a DIY enthusiast or hiring a professional, understanding these details will ensure your home looks crisp, clean, and professionally lit for years to come.
What Makes Govee Permanent Outdoor Lights Pro Different?
When customers ask me about the Pro version, the first thing I explain is that Govee didn't just make the lights bigger; they fundamentally changed how the light is projected. If you have seen standard LED strips, you know they can sometimes look like distinct “dots” on the wall. The Govee Permanent Outdoor Lights Pro are engineered to create a wash of light that feels more architectural and less like a holiday decoration.


The most significant upgrade is the brightness and the dedicated white channel. Previous models struggled to produce a true, crisp, cold white—often looking slightly blue or yellow. The Pro version includes dedicated warm and cold white lighting LEDs, allowing you to dial in that modern, high-end security lighting look that perfectly matches existing landscape lighting.
Furthermore, the lens design is different. It creates a better triangular lighting effect on the wall. This is crucial for that “scalloped” light look that you see on luxury homes. The weather resistance has also been beefed up, with an IP67 rating for the lights and adapter, meaning they can handle rain, snow, and dust much better than cheaper alternatives.
Another feature that installers love is the cut-ability. Unlike some earlier permanent systems where you were stuck with fixed lengths, the Pro strands can be cut and reconnected (with specific limitations), giving you much more flexibility when dealing with tricky roof peaks or separate dormers.
Govee Permanent Outdoor Lights vs Standard Versions
If you are trying to decide between the Pro and the standard versions, think about your end goal.
- Brightness: The Pro version puts out significantly more lumens. If you have a two-story home or high eaves, the standard version might look dim at ground level. The Pro has the punch to reach the ground effectively.
- Wire Durability: The cabling on the Pro feels more robust. It is designed to withstand UV exposure and temperature fluctuations better than the thinner wires on the standard models.
- Control: While both use the Govee Home App, the Pro’s driver module handles data more efficiently, leading to smoother animations and more consistent color rendering across long runs.
For more on the technical specs of smart lighting, check out this Guide to LED Light Specs by CNET.
How Long Do Govee Permanent Outdoor Lights Pro Last?
One of the most common questions I hear is about lifespan. Homeowners worry that “permanent” really means “permanent until they break in two years.” The reality is that LEDs themselves are incredibly long-lasting, typically rated for 50,000 hours of use. If you ran them for 6 hours every night, the bulbs themselves could theoretically last over 20 years.
However, the lifespan of the system depends heavily on environmental factors. Sun exposure is the biggest enemy. UV rays can degrade plastic lenses and wire insulation over time. This is where installation quality plays a huge role. If the wires are pulled tight with no slack, thermal expansion and contraction (getting hot in summer, freezing in winter) will eventually strain the connections, leading to failure.
Another failure point is the mounting method. The Pro lights come with VHB tape, which is strong, but it is not infallible. I have seen adhesive fail after a particularly hot summer or a wet winter, leaving lights dangling. When a light falls, it puts stress on the wire and the neighboring lights. Secure mounting doesn't just look better; it physically protects the system by relieving strain on the cables.
For insights on outdoor material durability, Bob Vila’s guide on outdoor materials is a great resource.
What’s Better: Govee Pro or Permanent Outdoor Lights Elite?
I usually tell customers this depends on what they want from their lighting. The permanent outdoor lights elite (often referring to the newer Govee Permanent Outdoor Lights 2) occupy a middle ground, and the choice isn't always obvious.
- Brightness and Effect: The Pro is still the king of brightness. If you want that bold, wash-the-whole-wall effect, Pro is the way to go. The Elite version is fantastic, and an upgrade over the original, but the Pro generally offers a wider wash of light due to the larger lens design.
- Installation Complexity: The Elite versions are slightly smaller and lighter, which can make them easier to handle if you are working alone on a tall ladder. However, the Pro’s larger form factor often looks more substantial on a large trim.
- Price Considerations: The Elite is usually more budget-friendly. For a standard ranch-style home or a single-story install, the Elite is often sufficient. But for large estates, homes with high peaks, or commercial spaces, the extra cost of the Pro is justified by the performance.
Best Use Case
Elite for Daily and Accent Lighting
Perfect for most suburban homeowners who want great holiday lighting and nice accent lighting.
Pro For More Complex, Architectural Lighting
Better for high-end installs, commercial buildings, or homeowners who are extremely particular about having true, bright white architectural lighting.
You can compare smart home devices in depth at Tom’s Guide Smart Home Reviews.
What Is the Difference Between Govee Pro and Trimlight?
Some customers also compare Govee to professionally installed systems like Trimlight or Jellyfish Lighting. This is the classic “DIY vs. Pro Service” debate.
- System Design: Trimlight is a channel-based system. The lights are embedded in an aluminum track that matches your soffit color. During the day, it is almost invisible. Govee Pro is a pod-based system. Without custom tracks or mounts, the pods are visible under the eaves.
- Cost Differences: This is the biggest differentiator. A Govee Pro system might cost you $500 to $1,500, depending on the size of your home. A professionally installed Trimlight system for the same house could easily run $3,000 to $6,000 or more. You are paying for the labor, the custom aluminum tracking, and the warranty on the installation.
- Flexibility: With Govee, you are in control. If a light breaks, you can replace the segment yourself. With proprietary systems, you are often reliant on the dealer for service calls.
- Smart Voice Control and Home Integration: Govee’s software is arguably superior for the average user. The app is incredibly feature-rich, creating complex scenes and syncing with music. While Trimlight has smart features, Govee’s integration with Google Home and Alexa is seamless and very user-friendly.
If you are looking for a deep dive on professional vs DIY automation, The Verge’s Smart Home Section often covers these trade-offs.
What I Tell Customers Before Installing Permanent Outdoor Lights Pro
Before you climb that ladder, there are a few practical things you need to plan out. I have seen too many people get halfway through an install and realize they have nowhere to plug in the power brick.
Power Access is Key
The driver and power brick for the Pro lights are bulky. You need to plan where these will go. Do you have an outlet in the soffit? Will you need to run power into the attic? Do not leave the power brick exposed to direct rain; while water-resistant, it’s best tucked away or mounted in a weatherproof box.
Measure Twice, Buy Once
Measure your eaves accurately, including the jumps between different roof sections. The Pro lights come in specific strand lengths. You need to know if you will need extension cables (which Govee sells separately) to bridge gaps between dormers.
Test Before You Mount
Plug the entire system in on the ground before you install a single light. Ensure every LED works. It is heartbreaking to install 100 feet of lights only to find out that strand #3 has a dead pixel.
Think About Daily Use
Don't just think about festive lighting. Think about how these lights will look in July. This is why I stress alignment. If your lights are crooked, the “cones” of light on the wall will be uneven, and it will look sloppy when you turn on the architectural white mode.
For electrical safety tips when working outdoors, refer to The Spruce’s Guide to Outdoor Wiring.
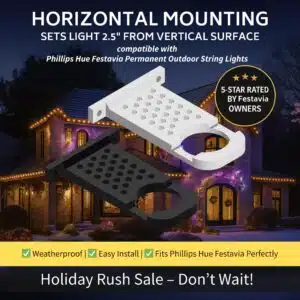
Why Mounting Matters More Than Most People Expect
This brings me to my favorite topic: mounting. Govee provides VHB (Very High Bond) tape on the back of every light. For many people, this is “good enough.” But in my experience, “good enough” doesn't last.
The adhesive is fighting gravity, UV rays, rain, and temperature shifts. Eventually, physics wins. When I designed my custom mounts at Deliciosa Decor, it was because I saw a need for a permanent solution for permanent lights.
Using a screw-in mount does three things:
- Alignment: A mount forces the light to sit perfectly straight. You can snap a chalk line, screw in your mounts, and pop the lights in. The result is perfectly spaced, perfectly straight cones of light.
- Longevity: A mechanical fastener (a screw) is infinitely more reliable than tape. Your lights will not fall down. Period.
- Cleanliness: It hides the wires better and looks like a finished product, not a sticker stuck to your house.
This is especially important for corners and peaks. The tension on the wire is highest at the corners. Adhesive often fails first. A mount relieves that strain.
Who Govee Permanent Outdoor Lights Pro Are Best For
The Pro lights aren't for everyone, but they are the perfect solution for a specific group of people.
- DIY Homeowners: If you are handy and comfortable on a ladder, this is the best bang-for-your-buck upgrade you can do for your home’s exterior.
- Holiday Enthusiasts: If you are tired of risking your neck every November to hang lights, this is a one-and-done solution that lets you change themes with a button press.
- Professional Installers: I work with many pros who use Govee lights as their hardware of choice but use custom mounts to deliver a “Trimlight-quality” finish at a competitive price.
- Businesses: The brightness of the Pro makes it excellent for commercial buildings that want to attract attention or provide security lighting.
For inspiration on lighting layouts, Houzz’s Exterior Lighting Ideas is a fantastic place to look.
Common Govee Outdoor Lights Mistakes I See During Installation
I want to save you some headaches. Here are the errors I see most often:
- Mounting Too Close to the Wall: If you mount the light pod right up against the vertical wall, you create a harsh “hot spot” of light rather than a nice wash. You generally want to mount them 2-4 inches away from the wall for the best effect.
- Poor Wire Routing: Leaving loops of wire hanging looks messy. Plan how you will hide the jump wires. Using matching cable raceways or tucking wires behind fascia boards makes a world of difference.
- Ignoring the “Data” Direction: Govee lights have a specific direction in which the data flows. If you cut a strand and try to connect it backward, the lights won't work. Always pay attention to the arrows on the connectors.
- Skipping the Cleaning Step: If you do rely on the adhesive, you must clean the soffit with alcohol first. Dust and pollen will kill the adhesion instantly.
For general DIY troubleshooting and how to pair DIY permanent lights with professional installation, Family Handyman is always a reliable source.

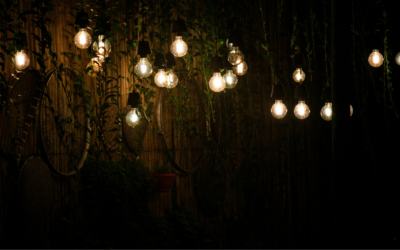
Photo by Towfiqu barbhuiya on Unsplash
Are Govee Permanent Lights Pro Worth It?
After working with dozens of different lighting systems, my honest perspective is that the Govee Permanent Outdoor Lights Pro are absolutely worth the investment if you install them correctly. They offer a level of brightness and customization that rivals systems costing five times as much.
However, the “Pro” in the name should be a reminder: they require a pro-level approach to installation. If you slap them up with dirty adhesive and crooked spacing, you will be disappointed. But if you take the time to plan your power, measure your spacing, and use proper mounts, you will have a system that transforms your home.
If you are planning an install, I always recommend starting with a clean mounting strategy. It is the difference between a project that looks like a weekend DIY hack and one that looks like a high-end architectural upgrade.
About Deliciosa Decor
At Deliciosa Decor, we believe in doing things right. As a Veteran-owned studio, we bring military precision to home décor. We design and manufacture precision-fit mounts specifically for Govee, Eufy, and Nanoleaf lights because we know that the details matter.
Our mounts are engineered to be durable, seamless, and easy to install, ensuring your lighting project looks flawless. Plus, we offer free shipping and an automatic 25% off every order because we believe premium quality should be accessible.