

Permanent outdoor lights have changed the way we decorate our homes. As a professional installer, I’ve worked with countless systems, but I keep coming back to Govee Outdoor Lights Pro. They are consistently a top choice for both homeowners and installers for good reason. Their durability is unmatched, they stand up to the elements year-round, and the flexibility in creating scenes and layouts makes decorating for any holiday or occasion effortless.
These lights make it simple to switch from a festive Christmas display to a spooky Halloween vibe or a patriotic Fourth of July theme with just a few taps on your phone. In this guide, I’ll walk you through how I measure, plan, and install Govee Outdoor Lights Pro to achieve a clean, professional finish that lasts.
What Makes Govee Outdoor Lights Pro Permanent Outdoor Lights Stand Out?
When you're considering a permanent lighting solution, the features matter. The Govee Outdoor Lights Pro system is packed with technology that makes the installation and daily use a great experience.
These lights are known for their incredible brightness and vibrant color options. With millions of colors and dynamic, customizable scenes, you can create the perfect ambiance for any mood or event. They are also built to endure the outdoors, with excellent weather protection that ensures they function flawlessly through rain, snow, and sun. For smart home enthusiasts, they integrate seamlessly with voice assistants, adding another layer of convenience.
For holiday lovers and DIY decorators, these outdoor lights are a dream. You install them once, and your decorating is done for years to come. Compared to other systems on the market, their combination of brightness, ease of use, and durable design makes them a leading contender. If you’re ready to upgrade your home’s exterior, you can purchase the Govee Outdoor Lights Pro system and get started.


Preparing Your Home for Govee Installation
A smooth installation starts long before you ever touch a light strand. Proper preparation is the key to a professional-looking result and saves a massive amount of time and frustration later. Here’s how I get ready for every job.
First, I measure every surface where the lights will be installed. This includes gutters, rooflines, patios, and even fences. Precise measurements are non-negotiable. Next I continue to plan the layout, considering the home's architecture. My goal is to enhance the lines of the house, not fight them. I use these measurements to determine the spacing and angles for a uniform look.
Before I begin, I ask customers several questions: What architectural features do they want to highlight? What are their goals for seasonal decorating? This ensures the final layout meets their vision. Finally, I make sure to protect all work surfaces. A little prep work goes a long way in preventing accidental scuffs or damage to your home. Taking the time to plan correctly guarantees the installation is efficient and the results are stunning.
The Tools and Materials I Use
Having the right tools for the job makes all the difference between a frustrating afternoon and a successful installation. Some items are essential, while others just make the process smoother.
Here's my go-to list:
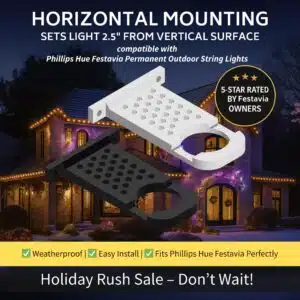
- Mounting Clips or Permanent Mounts: The clips included with Govee lights work, but for a truly permanent and secure solution, I always recommend custom mounts.
- Cable Management: Clips and ties to keep wiring neat and hidden.
- Cleaning Materials: Isopropyl alcohol and cloths to clean mounting surfaces for better adhesion.
- Basic Tools: A ladder, measuring tape, and a drill (if needed).
As an installer, I was never fully satisfied with the generic clips on the market. That’s why I designed my own custom light mounts. Professional installers prefer precision-fit mounts because they provide a secure hold that protects the lights and the home. At Deliciosa Decor, we offer a range of precision-engineered mounts for Govee, Eufy, and Nanoleaf systems that ensure a perfect fit every time.

Photo by Polina Kuzovkova on Unsplash
Step-by-Step: How I Install Govee Outdoor Lights Pro
This is where the planning comes together. Follow these steps for a clean, secure, and professional-grade installation of your permanent outdoor lights.
- Clean and Prep the Mounting Area: Use isopropyl alcohol to wipe down every surface where you will place a mount. This removes dirt and oils, ensuring the best possible bond.
- Lay Out the Lights: Before attaching anything, lay the light strands on the ground below where you’ll be installing them. This helps you confirm your layout and ensure your strands reach their power source without being stretched.
- Install Mounts for Permanent Outdoor Lights: Install your mounting clips or custom mounts according to your planned spacing. For Deliciosa Decor mounts, I simply peel the backing from the pre-applied VHB tape and press it firmly onto the clean surface for 30 seconds.
- Snap in the Lights: Once the mounts are in place, gently snap each light into a mount. You’ll hear a satisfying click as it locks in securely.
- Hide the Wiring: Use cable management clips to tuck away any excess wiring along gutters or under eaves. The goal is for only the lights to be visible.
- Connect and Test: Plug in the system and use the Govee app to test the lights. Make sure all connections are secure and every light is working properly before you put the ladder away.
- Set Scenes and Adjust Brightness: Now for the fun part! Use the app to explore different scenes, set your preferred colors, and adjust the brightness to your liking.
Common Installation Mistakes to Avoid
I’ve seen it all, and a few common mistakes can turn a great product into a messy installation. Here are the top errors to avoid.
- Not Measuring Correctly: “Eyeballing it” leads to uneven spacing and can leave you short on lights.
- Overstretching Light Strands: This puts stress on the wiring and connections, leading to premature failure. Always allow a little slack.
- Ignoring Surface Texture: Rough or dirty surfaces prevent adhesives from bonding properly. Always clean and prep.
- Using Weak Adhesives: The included clips are a good start, but for long-term hold through all weather, a professional-grade mount with strong adhesive is better.
- Forgetting to Protect Wiring: Exposed wires are vulnerable to weather and pests. Tuck them away securely.
- Skipping Layout Planning: Jumping straight to installation without a plan is a recipe for a crooked, unprofessional look.
Dial In Your Outdoor Lights Scenes Like a Pro
Once your lights are installed, you can unlock their full potential by customizing scenes. I help customers pair their home’s design style with light placement to create stunning effects.
Try creating seasonal settings for holidays, or design color-coordinated scenes that match your favorite sports team on game day. You can also set timers so your lights turn on and off automatically. Use them as accent lighting for gardens, porches, and patios to add year-round curb appeal.
Why Precision-Fit Custom Light Mounts Make All the Difference
Here’s a truth every pro knows: your installation is only as good as your mounts. Generic clips often fail because they are made from lower-quality materials that become brittle in the sun and cold. Their “one-size-fits-all” design rarely provides a secure grip, leading to sagging lights.
Precision-fit mounts from Deliciosa Decor protect your investment in your lights and your home. They are custom-designed for each specific Govee model, ensuring a perfect fit that won’t damage the light casing. Made from professional-grade, weather-resistant materials, these mounts are built to last. It’s why professional installers and serious DIYers rely on them for a flawless finish. You can shop our Govee light mounts to see the difference for yourself. Plus, every order includes free shipping and an automatic 25% discount.
When to DIY and When to Call a Pro
So, should you install the lights yourself or hire a professional? Many homeowners can handle a straightforward installation on a single-story home. If you are comfortable on a ladder and follow the preparation steps, a DIY installation is very achievable.
However, it’s time to call a pro when you’re dealing with high or complex rooflines, tricky layouts, or simply don't have the time. Some customers prefer hiring a professional for the peace of mind that comes with experience. Deliciosa Decor supports both DIYers and pros by providing top-tier products that simplify any installation.
Final Tips Before You Hit “Buy”
Before you make your final purchase, run through this quick checklist:
- Double-check your measurements.
- Choose a layout that fits your home’s shape.
- Pick a lighting style that complements your home’s surroundings.
- Make sure the mount style you choose fits the Govee Outdoor Lights Pro model you purchased.
Ready to get started? You can shop for the perfect mounts and purchase with confidence.
Ready to Install Your Govee Outdoor Lights Pro?
With the right tools and a solid plan, you can achieve a professional installation that will beautify your home for years. The right mounts truly make all the difference, providing a secure, clean look that lasts.
Click this link – https://deliciosadecor.com/product-category/light-mounts/govee/ – to explore Deliciosa Decor’s custom mounting options to give your project the professional finish it deserves. Remember, every order gets an automatic 25% discount and free shipping. If you have questions or need a custom solution for your light model, don’t hesitate to reach out. We’re here to help.


